-
-
Technical Support Contacts:
-
Phone: 262-746-3374
-
Email: techsupport@goffscw.com
-
Website: http://www.goffsenterprises.com
-
-
-
Prior to installation, unroll all Door Strips and place them on a clean, flat surface in a warm atmosphere for a minimum of twenty-four (24) hours. This will allow the Strips to return to their original form.
-
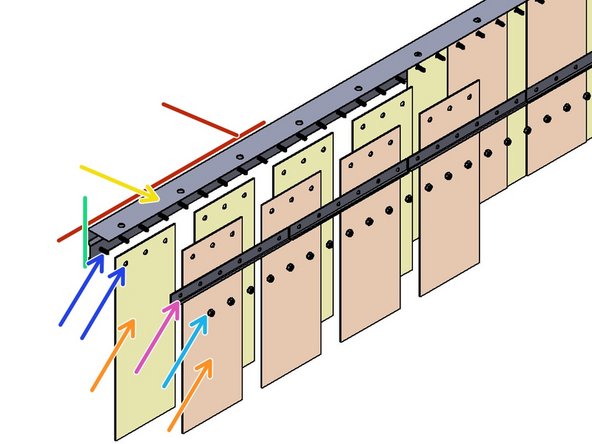
Mounting Surface
-
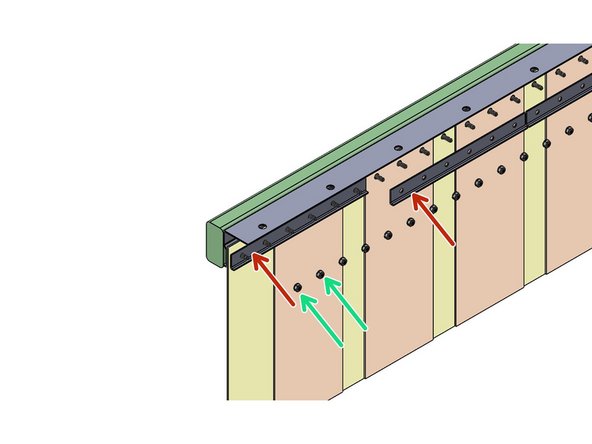
Wall Mounting Hardware (by others)
-
Threaded Stud
-
Hex Nut
-
Face Plate
-
Strips
-
Track, Strip Door
-
-
-
Snap a Chalk Line on the Mounting Surface to indicate the position of the Track along the run.
-
Install the First section of Track at the Left End of the Curtain Run.
-
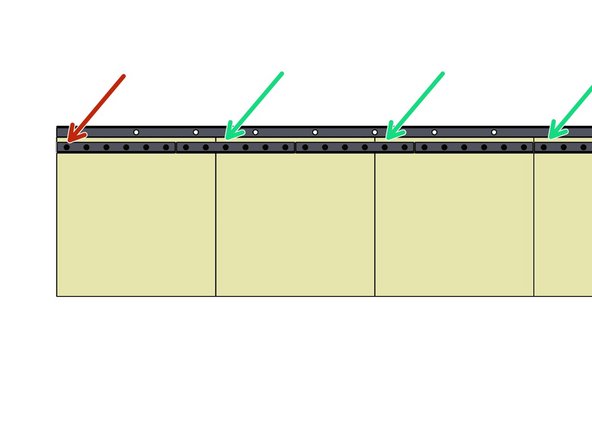
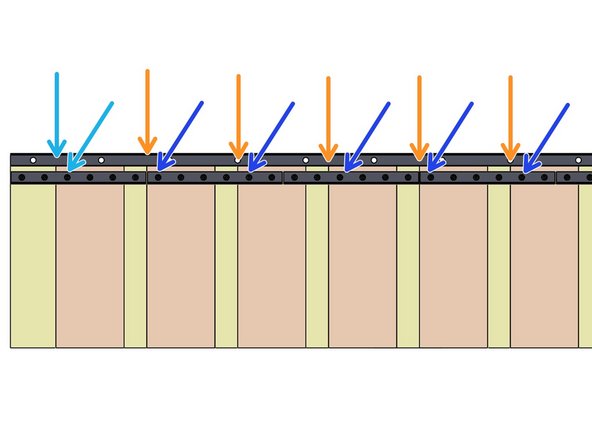
For successive Track Sections, ensure that the Treaded Studs are 2" apart at Track Joints. Use a Face Plate across adjacent Track sections to help set the distance.
-
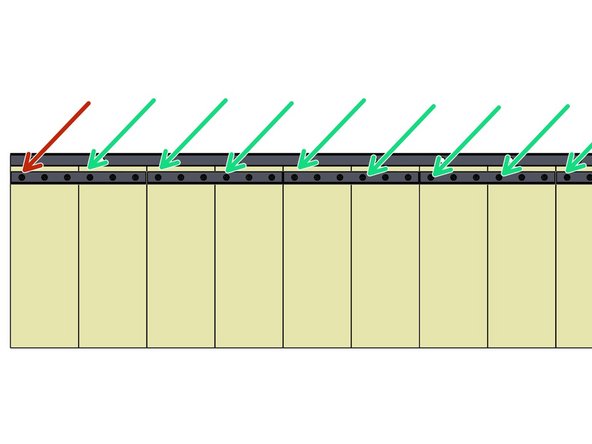
Install the First Strip on the First Stud (in all configurations).
-
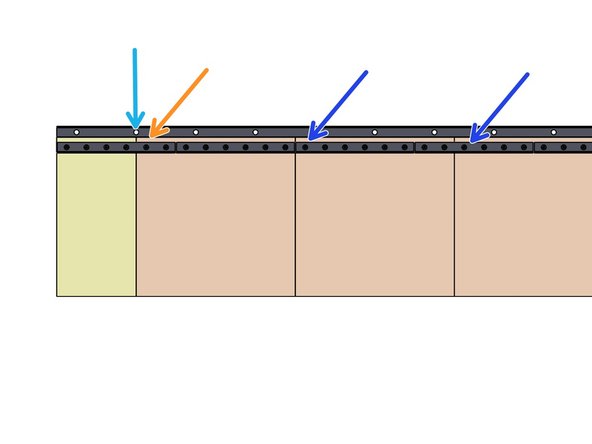
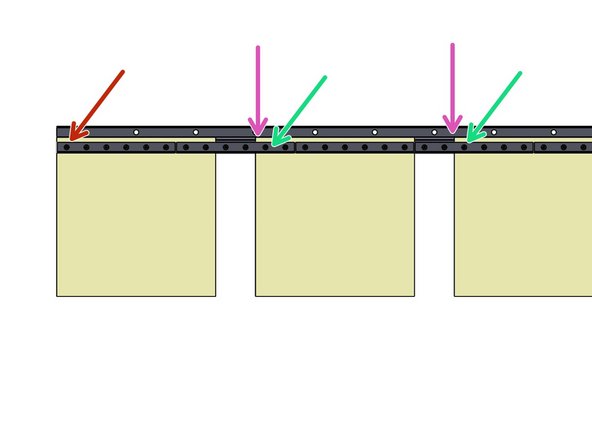
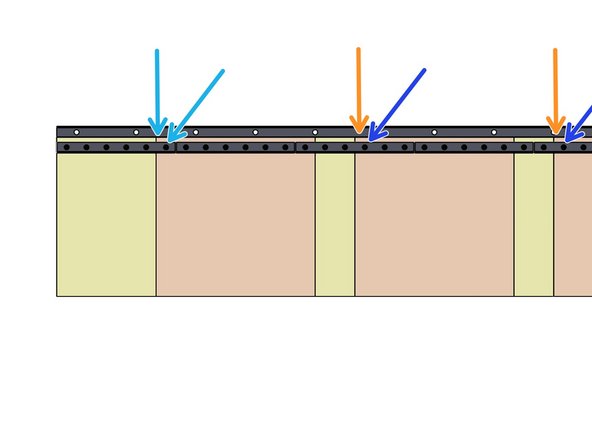
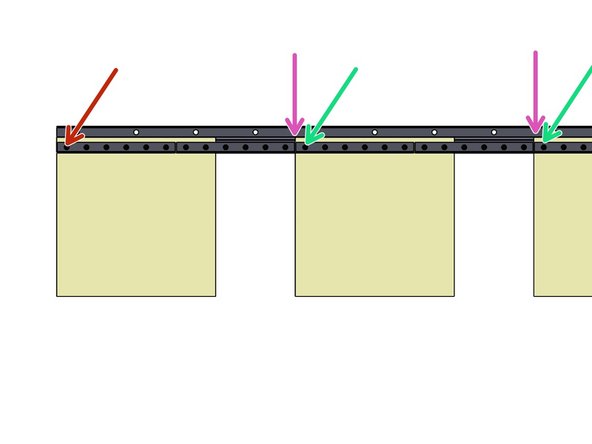
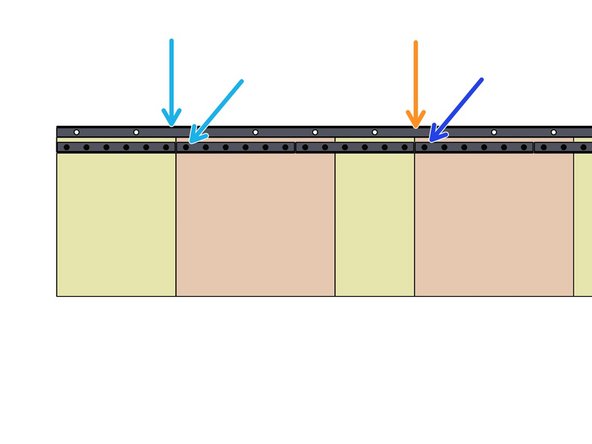
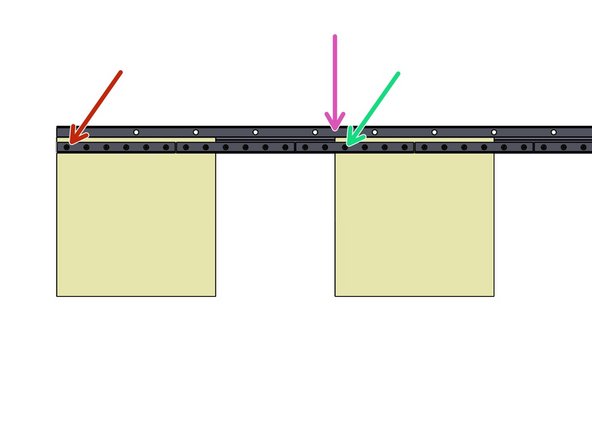
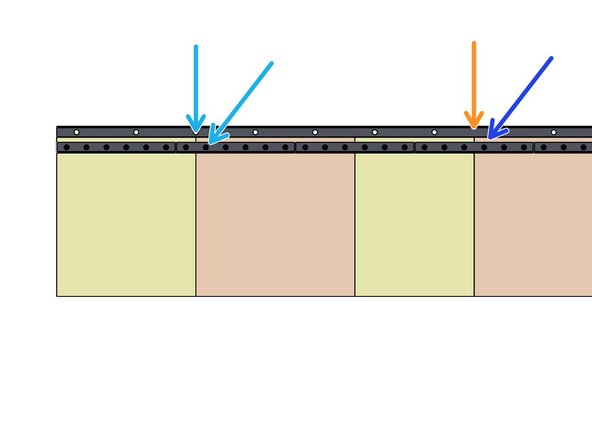
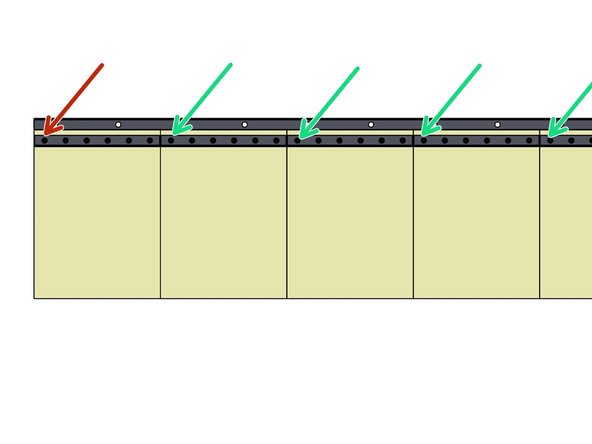
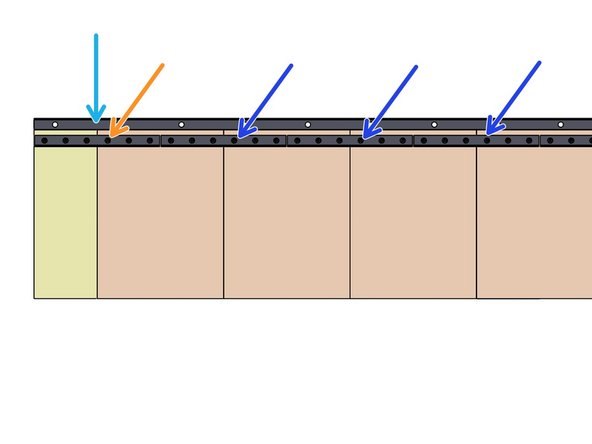
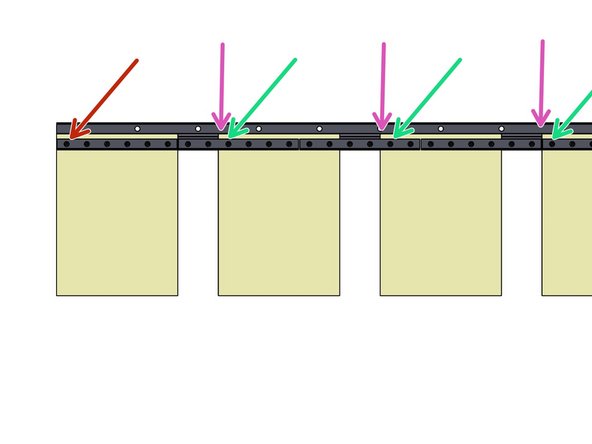
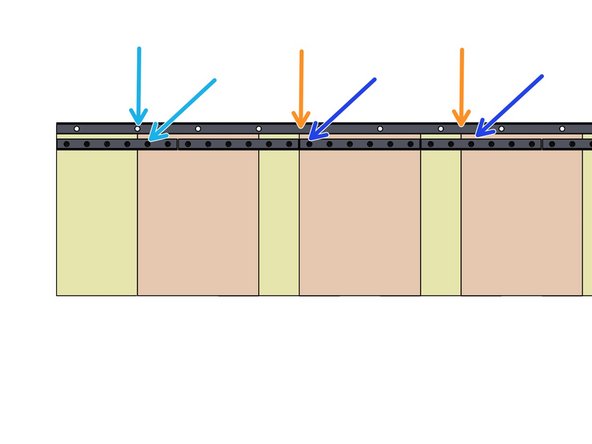
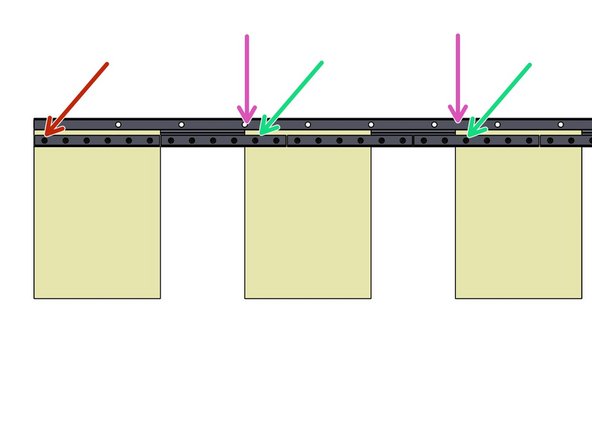
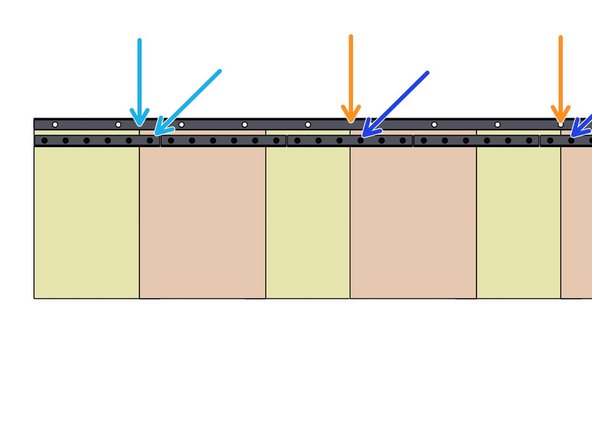
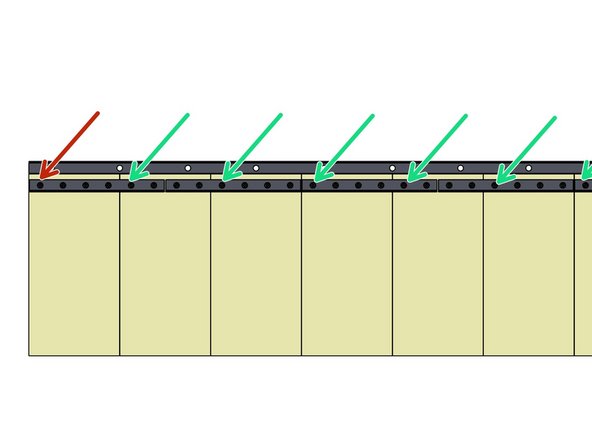
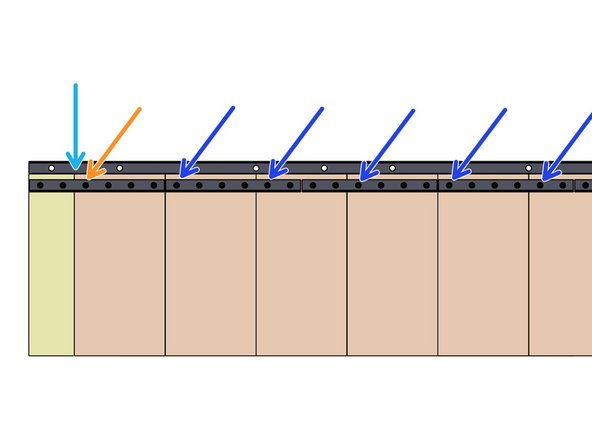
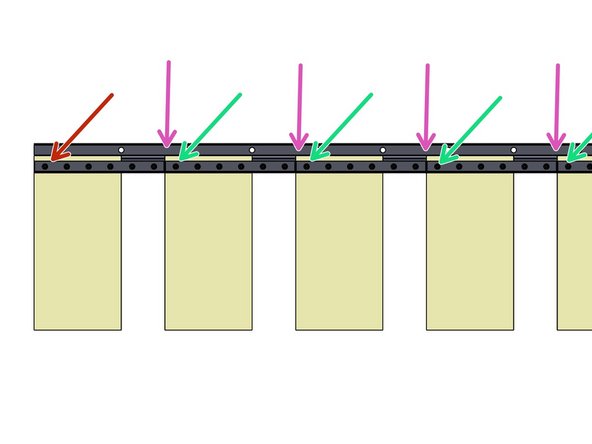
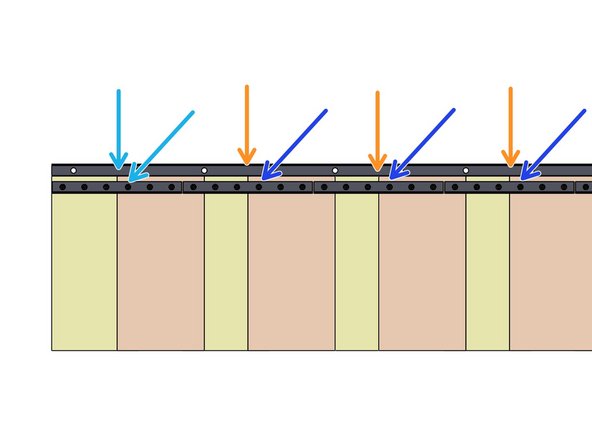
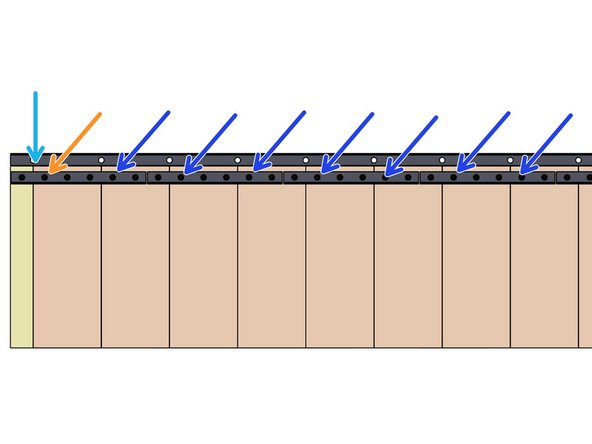
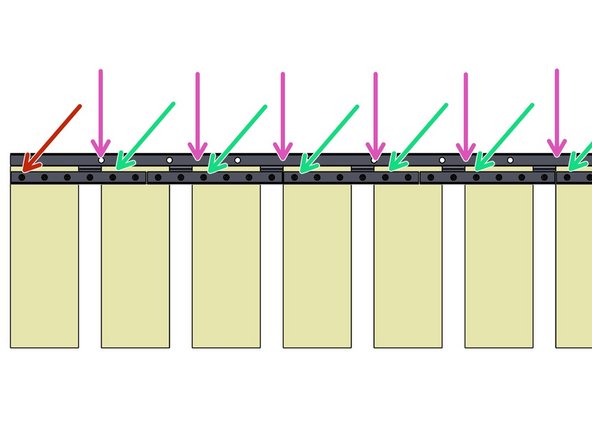
Refer below to match the Strip Width and Percent of Coverage on the Work Order. Follow the Instructions for Spacing the First and Second Layers.
-
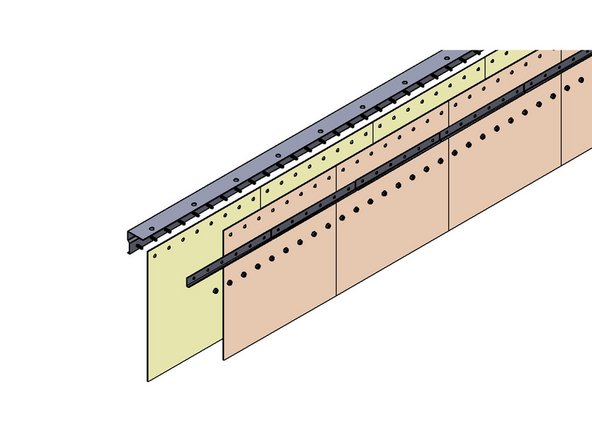
Install the First and Second layers of Strips with opposing "Cupping" of Strips as noted below.
-
Secure the Strips with the Face Plates. Every Stud should be covered along the Run.
-
Secure the pack with a Hex Nut on every Threaded stud.
-
-
-
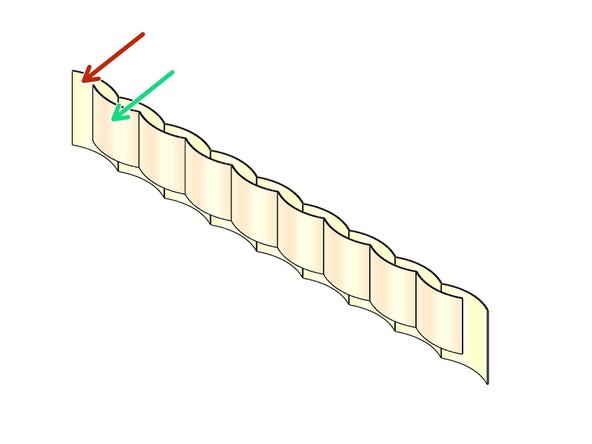
Concave sides of alternating Layers must face each other.
-
View from the Front. Lengths shown are for illustration purpose only.
-
To Install Strips, press the Strip's holes onto the Threaded Studs of the Track.
-
Install the First Layer of Strips with the Concave /cupped surface facing the Front.
-
Install the Second Layer of Strips with the Concave /cupped surface facing the Rear.
-
-
-
Place the 1st Strip onto the 1st Stud.
-
Install successive Strips on the next Studs.
-
2nd Layer - Leave an 8" Gap
-
and install the First Strip of the Second Layer.
-
Install successive Strips on the next Studs.
-
-
-
Place the 1st Strip onto the 1st Stud.
-
Leave a 4" Gap
-
and Install the Second Strip of the First Layer.
-
Leave a 4" gap between successive Strips.
-
2nd Layer - Leave a 10" Gap and install the First Strip of the Second Layer.
-
Leave a 4" Gap
-
and Install the Second Strip of the Second Layer.
-
Leave a 4" gap between successive Strips.
-
-
-
Place the 1st Strip onto the 1st Stud.
-
Leave an 8" Gap
-
and Install the Second Strip of the First Layer.
-
Leave a 8" gap between successive Strips.
-
2nd Layer - Leave an 12" Gap and install the First Strip of the Second Layer.
-
Leave an 8" Gap
-
and Install the Second Strip of the Second Layer.
-
Leave a 8" gap between successive Strips.
-
-
-
Place the 1st Strip onto the 1st Stud.
-
Leave a 12" gap
-
and Install the Second Strip of the First Layer.
-
Leave a 12" gap between successive Strips.
-
2nd Layer - Leave a 14" Gap and install the First Strip of the Second Layer.
-
Leave a 12" gap
-
Install the Second Strip of the Second Layer.
-
Leave a 12" gap between successive Strips.
-
-
-
Place the 1st Strip onto the 1st Stud.
-
Install successive Strips on the next Studs.
-
2nd Layer - Leave an 6" Gap
-
and install the First Strip of the Second Layer.
-
Install successive Strips on the next Studs.
-
-
-
Place the 1st Strip onto the 1st Stud.
-
Leave a 4" gap
-
and Install the Second Strip of the First Layer.
-
Leave a 4" gap between successive Strips.
-
2nd Layer - Start by Leaving an 8" gap and install the First Strip of the Second Layer.
-
Leave a 4" gap
-
and Install the Second Strip of the Second Layer.
-
Leave a 4" gap between successive Strips.
-
-
-
Place the 1st Strip onto the 1st Stud.
-
Leave an 8" Gap
-
and Install the Second Strip of the First Layer.
-
Leave a 8" gap between successive Strips.
-
2nd Layer - Leave a 10" gap and install the First Strip of the Second Layer.
-
Leave an 8" Gap and Install the Second Strip of the Second Layer.
-
and Install the Second Strip of the Second Layer.
-
Leave a 8" gap between successive Strips.
-
-
-
Place the 1st Strip onto the 1st Stud.
-
Install successive Strips on the next Studs.
-
2nd Layer - Leave a 4" Gap
-
and install the First Strip of the Second Layer.
-
Install successive Strips on the next Studs.
-
-
-
Place the 1st Strip onto the 1st Stud.
-
Leave a 4" Gap
-
and Install the Second Strip of the First Layer.
-
Leave a 4" gap between successive Strips.
-
2nd Layer - Leave a 6" Gap and install the First Strip of the Second Layer.
-
Leave a 4" Gap
-
install the Second Strip of the Second Layer.
-
Leave a 4" gap between successive Strips.
-
-
-
Place the 1st Strip onto the 1st Stud.
-
Install successive Strips on the next Studs.
-
2nd Layer - Leave a 2" Gap
-
and install the First Strip of the Second Layer.
-
Install successive Strips on the next Studs.
-
-
-
Place the 1st Strip onto the 1st Stud.
-
Leave a 2" Gap
-
and Install the Second Strip of the First Layer.
-
Leave a 2" gap between successive Strips.
-
2nd Layer - Leave a 4" Gap and install the First Strip of the Second Layer.
-
Leave a 2" Gap
-
and install the Second Strip of the Second Layer.
-
Leave a 2" gap between successive Strips.
-
-
-
Slide the supplied Face Plates onto the Threaded Studs.
-
Thread the supplied Hex Nuts onto the Threaded Studs.
-
-
-
Before Final Trim along the bottom, allow the PVC Door Strips to hang in place for 24 to 48 hours.
-
Bend the excess portion of the Strips onto the floor
-
Snap a Chalk Line to reference while trimming the Strips.
-
Finished Strips should have ¼” of clearance from the floor surface.
-
Measure from the Reference Chalk Line to the desired Trim Dimension.
-
Trim Strips using a utility knife. They can be scored partway through, then torn by hand.
-
Wipe the chalk off of the Strips.
-
Almost done!
Finish Line


