Introduction
Thank you for ordering a Portable Safety Partition from Goff’s Enterprises Inc. Please review this guide and follow the steps and tips to ensure proper installation, maximizing the functionality and longevity of your product.
-
-
Using a Socket Wrench, tighten the 5/16-18 Hex Bolt with the 5/16" Lock Washer to fasten the foot mounting bracket to the top face of the foot as shown.
-
Be sure the foot mounting bracket is oriented as shown with the tall side of the bracket facing one of the long edges of the foot or there will be interference when mounting the foot to the frame.
-
-
-
Locate the bottom of the Safety Partition Assembly which is the end with with the sweep.
-
Insert the foot mounting bracket into the bottom end of the vertical frame piece until the top of the foot is touching the bottom of the vertical frame.
-
-
-
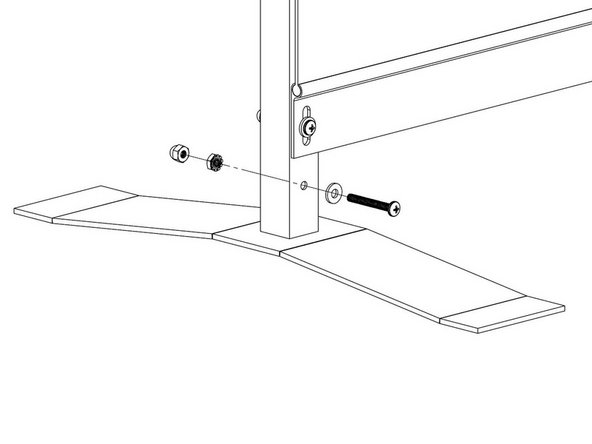
Use a 10-32 x 1-1/2" Pan Head Screw with a flat #10 washer through the front of the bottom hole on the vertical frame and tighten on the back side with a 10-32 Kep Nut and lastly the 10-32 Acorn Nut.
-
Ensure screws are fully tightened to make sure the feet do not fall out.
-
Floor Sweep is hidden in this image to highlight fastener details.
-
If you notice interference when trying to mount the feet, go back to Step 1 to ensure the Foot Mounting Bracket is oriented correctly.
-
-
-
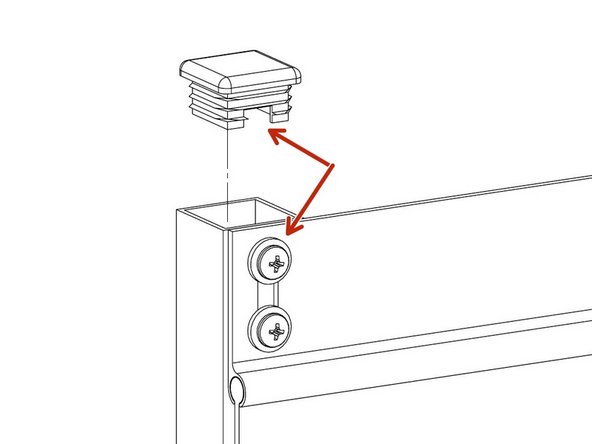
Gently tap the black plastic caps included with the hardware kit into the top of the vertical frames.
-
Be sure the face of the cap with the small cutout is aligned with the same face of the vertical track with the screws to avoid interference.
-
The assembly is now complete. Be sure all fasteners are fully tightened to ensure maximum functionality of your product.
-
Cancel: I did not complete this guide.
One other person completed this guide.


