
Tools
Optional Tools
-
-
Technical Support Contacts:
-
Phone: 262-746-3374
-
Email: techsupport@goffscw.com
-
Website: http://www.goffsenterprises.com
-
-
-
Measure the Opening Width near the top of the Opening.
-
Divide that overall width measurement in half to find the Centerline location.
-
Clearly Mark the Centerline location.
-
-
-
The Header Measuring Process is identical for all Door Models. The Door Model you are installing may be different from the Model shown.
-
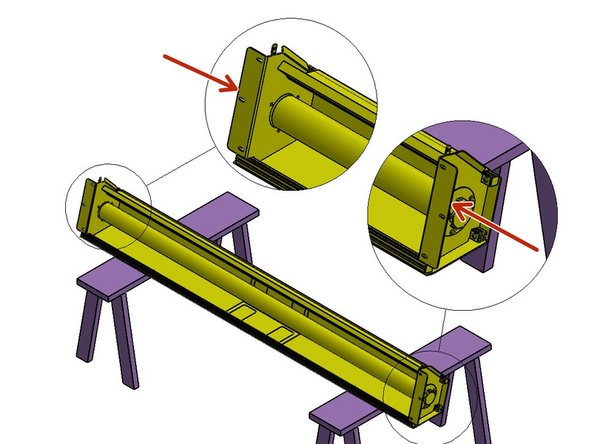
Place the Door roll Header Assembly across a safe and level work surface, and rotate the roll assembly frame so that the Header Bracket Mounting flanges are facing upward.
-
Measure the total width of the whole roll assembly from outermost edge of one Header Bracket’s Mounting flange to the outermost edge of the opposite side.
-
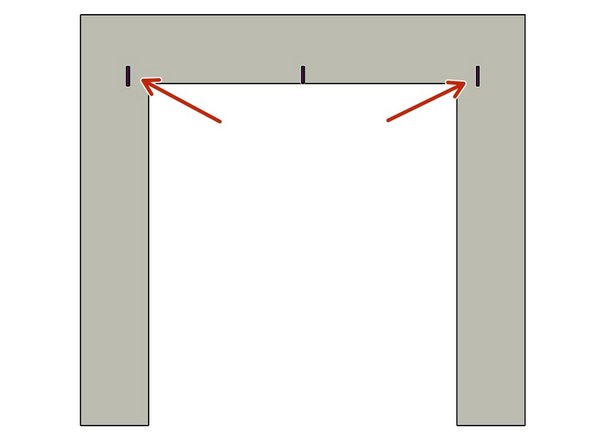
Divide that number by 2. This number is 1/2 of the Header Width, and is used to determine the Header location on the Left and Right Sides of the opening.
-
-
-
Mark this dimension on each side of the Opening Center mark.
-
-
-
The Track Measuring Process is identical for all G1 Door Models. The Door Model you are installing may be different from the Model shown.
-
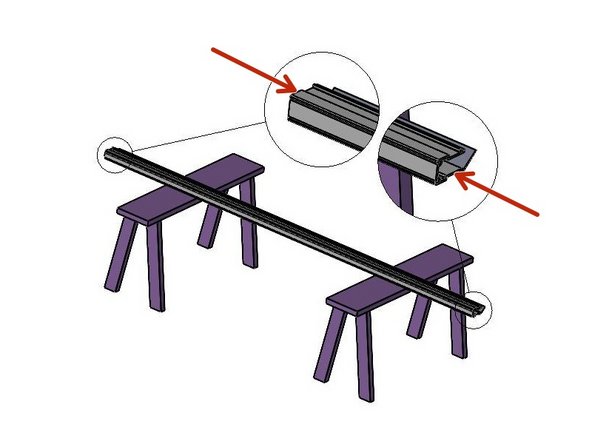
Set one of the Vertical Track Assemblies on your work surface.
-
Measure the Length of the Vinyl Track only.
-
ADD 4” to this number and take note.
-
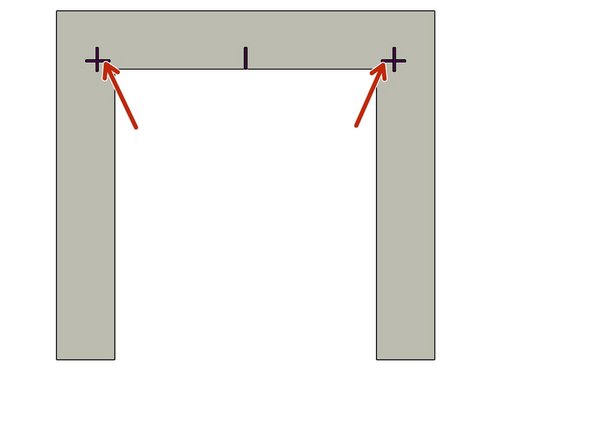
This is the Height dimension needed to mark the location of the Bottom edge of the Header Mounting Brackets.
-
-
-
With the Calculated number (Track length + 4"), add a Horizontal line on each side of the Opening that intersects the previously drawn Vertical line.
-
-
-
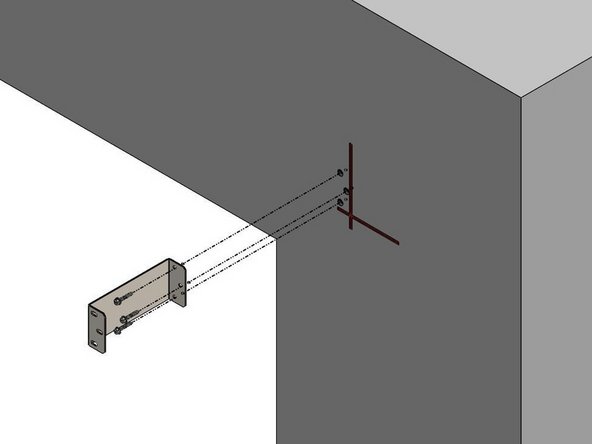
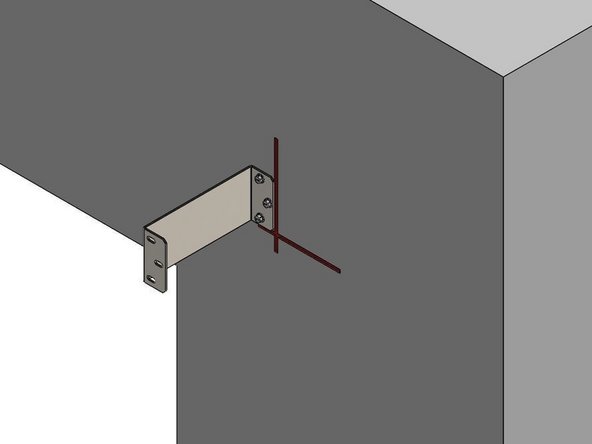
Orient the slotted end of the Header Mounting Projection Bracket against the Mounting Surface.
-
Orient the flange outward.
-
Align the Bottom surface of the Header Mounting Bracket with the Horizontal line on the Mounting Surface.
-
Align the Outer edge of the Header Mounting Bracket with the Vertical line on the Mounting Surface.
-
Trace the slotted mounting slots onto the Mounting Surface.
-
-
-
Loosely fasten Bracket to the Mounting Surface with appropriate hardware.
-
Plumb the Bracket.
-
Tighten Hardware securely.
-
Repeat for the other Header Mounting Bracket.
-
-
-
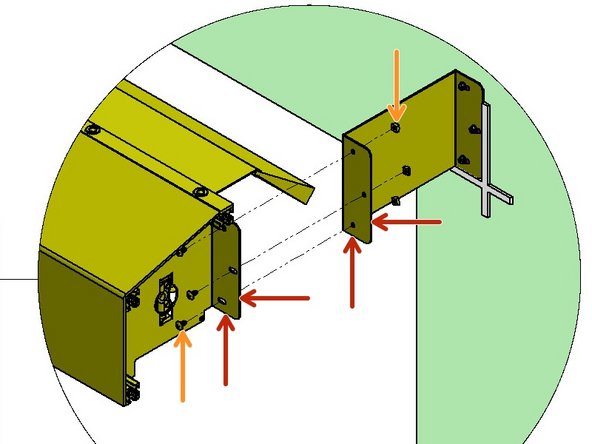
Use two (2) people, and two ladders at minimum to Install the Roll Header Assembly.
-
Raise the Roll Header Assembly into place on the Projection Brackets.
-
Loosely tighten with three (3) sets of ¼-20 screws and hex nuts per side.
-
Do not fully tighten hardware until the Header Assembly Brackets are aligned with the Projection Bracket’s edges.
-
Check the Header Assembly for level, and make any necessary final adjustments.
-
Once aligned, fully tighten all six sets of hardware.
-
At this point leave the roll assembly tied off and held in place as it comes.
-
-
-
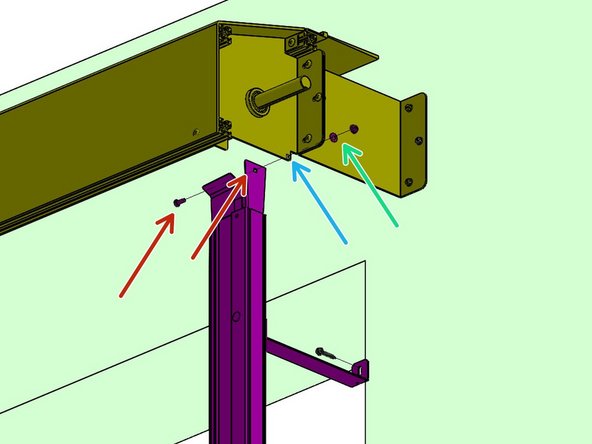
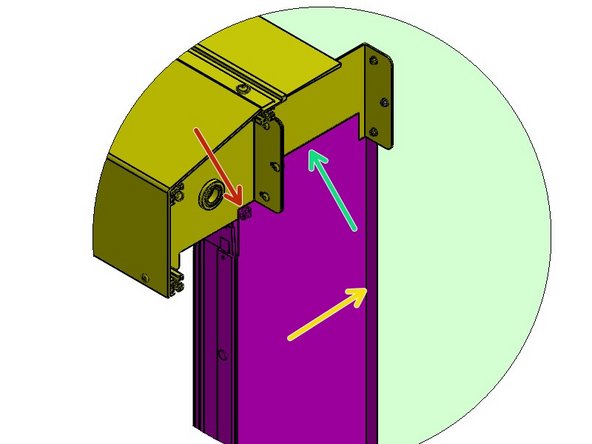
The Track Transition Bracket mounts to the Inside of the tab of the Header Assembly Mounting Bracket.
-
It is important to insert the Carriage Bolt from the inside of the Transition Bracket and the Washer and Hex Nut on the outside of the Header Bracket.
-
The Track must be plumb before securing it to the Mounting Surface.
-
-
-
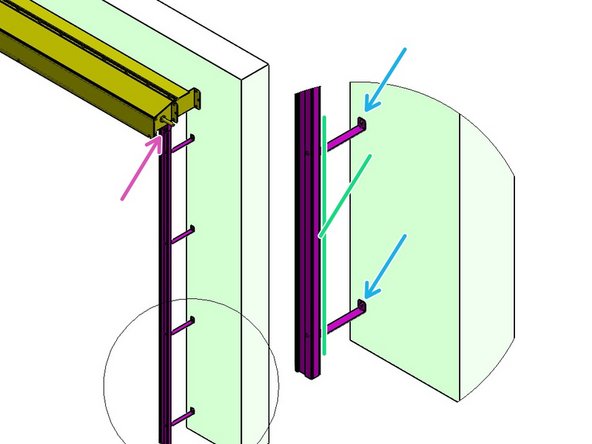
Tracks are marked for orientation as Left Side, and Right Side.
-
Lay the two Vertical Track Assemblies on your work surface.
-
Un-roll the Side Seal material.
-
Remove the Plugs from the front of the Track
-
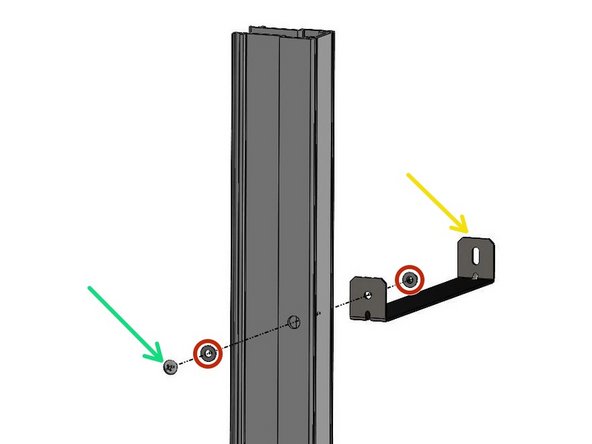
Locate the Track Projection Mount Brackets, four (4) per Track.
-
Locate four the ¼-20 Screws and Flanged Nuts.
-
-
-
Push a screw through the hole in the back surface from the inside of the Track.
-
Slip the Projection Bracket onto the 1/4-20 Screw, with the hole facing the Track, and then thread the nut, onto the screw.
-
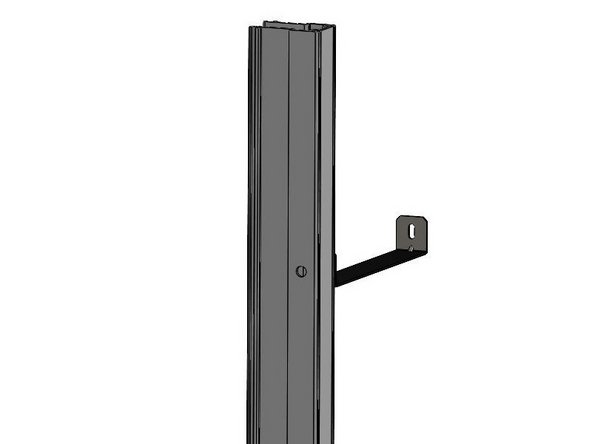
The slotted end of the Projection Bracket will fasten to the Mounting Surface in a later step.
-
These Brackets should be Mounted so that their Flanges point Vertically (as shown).
-
Fully tighten the hardware for these brackets once they are aligned with the Track edges.
-
Re-install the Plug Caps into the hardware access holes on the front side of the Tracks.
-
-
-
The Track assembly mounts to the Inside of the Header Assembly Mounting Bracket.
-
From the inside of the Track, Insert the Carriage Bolt fully through the Square hole.
-
Then push the Carriage Bolt through the Header Bracket from the Inside.
-
Slide the Washer onto the Bolt from the outside of the Header Bracket , and snug the Hex Nut on the Bolt. (This Track Mount hardware will be removed in later steps.)
-
-
-
Plumb the Track Left to Right.
-
Transfer the Mounting Hole locations onto the Mounting Surface.
-
Remove the Track, and prepare these locations for Hardware appropriate to the Building Material.
-
Reinstall, snugly, the Track Mount Hardware. (It will be removed again in a later step.)
-
With the Track “hanging” in this position, Plumb the Track Left to Right.
-
Secure the Track Brackets to the Mounting Surface.
-
Tighten all of the Hardware Securely.
-
-
-
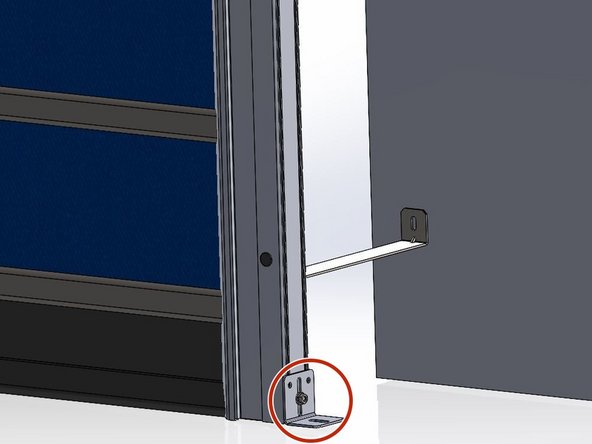
Installing this Provided Kit is Recommended by Goff's.
-
The purpose of this Kit is to Anchor the Vertical Tracks to the Floor to completely inhibit their ability to move left and right.
-
-
-
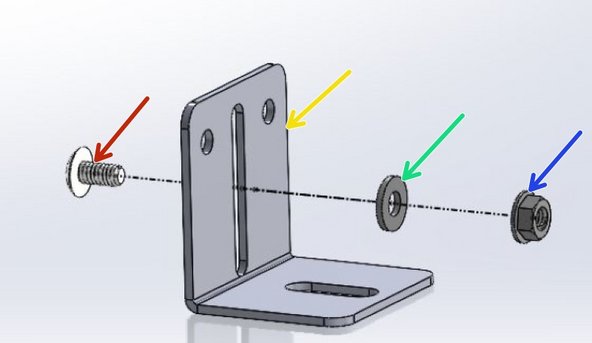
What you will Receive:
-
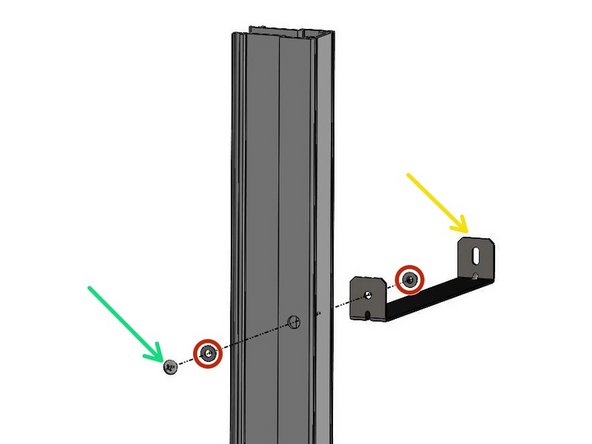
L-Bracket
-
1/4-20 Machine Screw
-
1/4in ID Flat Washer
-
1/4-20 Serrated Flange Nut
-
-
-
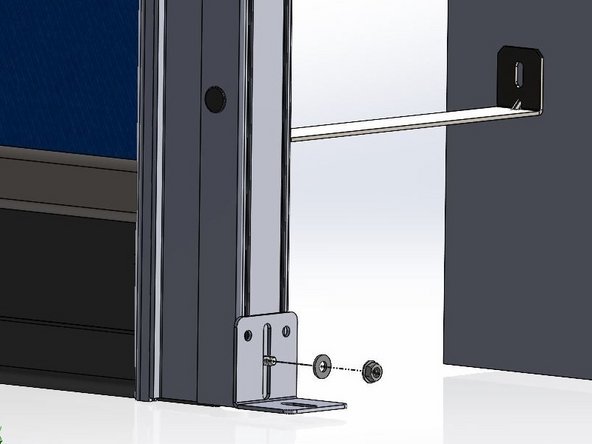
Set the Bracket in place at the bottom of the Vertical Track and make a mark on the Track for a through hole.
-
Drill a clearance hole for the 1/4-20 Machine Screw.
-
Insert the Machine Screw from the Inside the Vertical Track so that the Threaded end sticks out, allowing the Bracket, Washer, and Flange Nut to be installed on the outside of the Track.
-
-
-
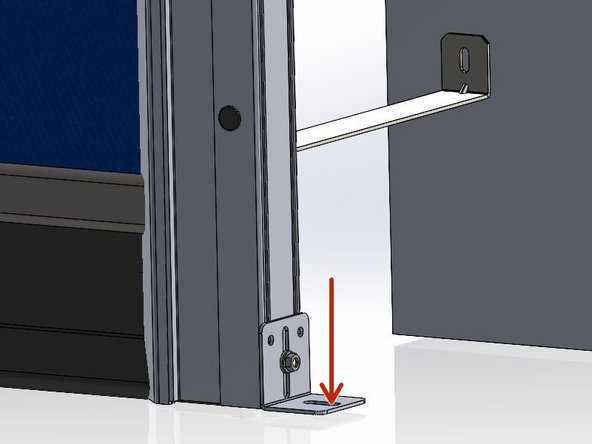
Drill directly through the bottom hole on the bracket into the floor.
-
Fasteners for anchoring into the floor/ground are not provided.
-
Please use best judgment to decide the appropriate fastener for your specific floor material.
-
Repeat on opposite Vertical Track Assembly.
-
Completely tighten all fasteners to ensure Vertical Tracks are wobble-free.
-
-
-
Remove the Track Mounting Hardware.
-
Re-Install the Hardware with the Side Seal Grommet under the Washer and Nut, then tighten Securely.
-
Affix the Hook and loop Material to the Header Bracket along the Top Edge of the Side Seal Material.
-
Fold and Secure the Side Seal Material to the Mounting Surface.
-
-
-
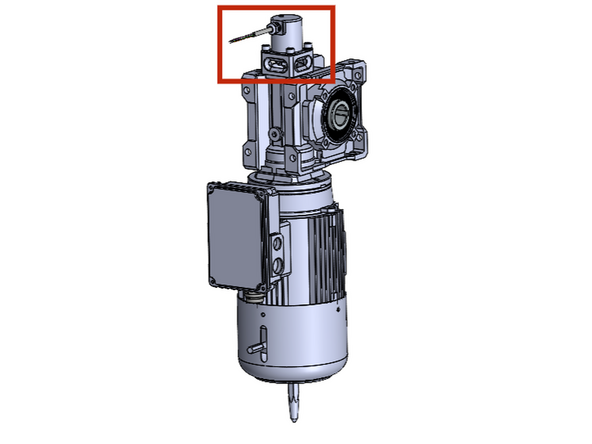
New Door Orders will come with the Encoder Mounted on the Motor from the Factory. Note that your encoder may not look exactly like the one shown.
-
-
-
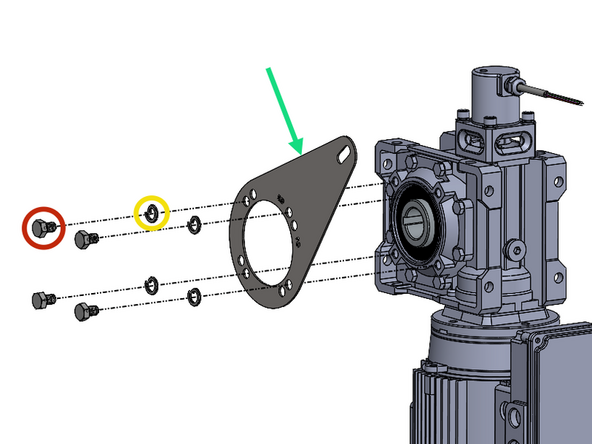
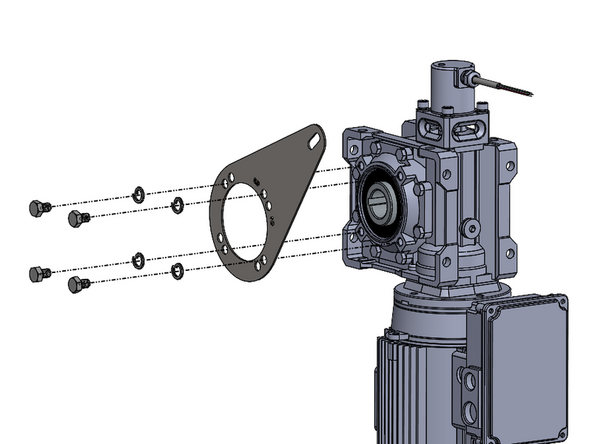
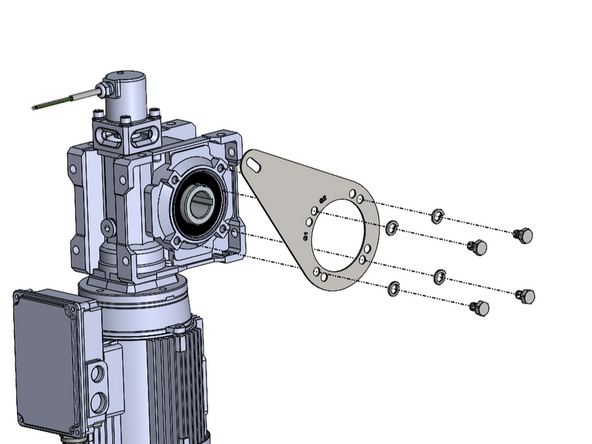
(4) M8 x 1.25mm x 12mm Long Socket Cap Screws
-
Requires 1/2in Socket or Wrench
-
(4) M8 Split-Lock Washers
-
(1) Motor Mount Anti-Torque Bracket
-
-
-
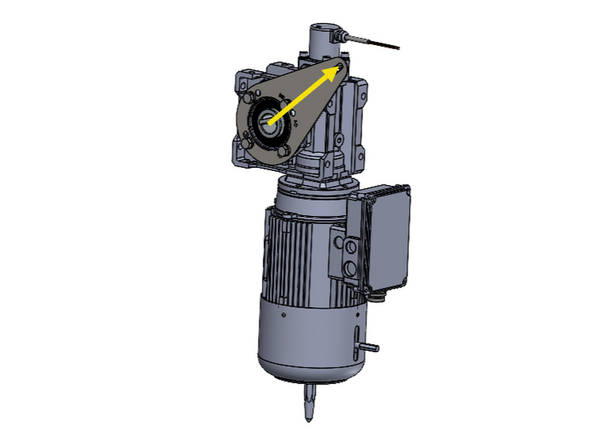
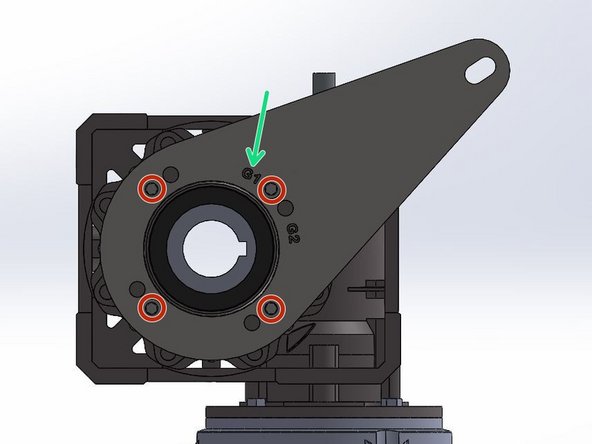
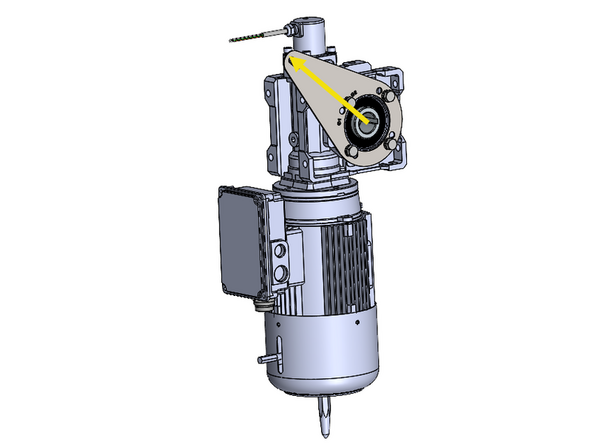
Note the Orientation of the Bracket in Relation to the Motor.
-
The Bracket has 2 Hole-Patterns Corresponding the G1 and G2 Doors. This ensures the proper Alignment when Installing the Motor Assembly onto a G1 or G2 Door.
-
For a Model 2000 Door, Use the G1 Hole Pattern, and Vice Versa.
-
G1 Doors include Model 2000 and Clean Guard.
-
On a RH Drive G1 Door, the Letters will Read Normally/Forward when the Bracket is Mounted onto the Motor.
-
Place the Bracket up on the Motor with the proper Hole Alignment.
-
Place the Lock Washer onto the Screw and Fasten the Bracket onto the Motor.
-
-
-
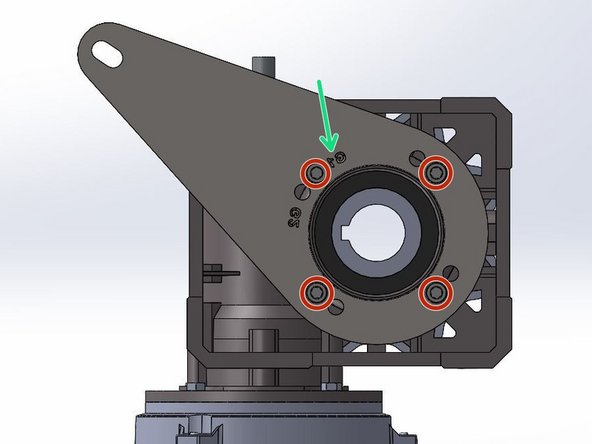
Note the Orientation of the Bracket in Relation to the Motor.
-
The Bracket has 2 Hole-Patterns Corresponding the G1 and G2 Doors. This ensures the proper Alignment when Installing the Motor Assembly onto a G1 or G2 Door.
-
For a Model 2000, Use the G1 Hole Pattern, and Vice Versa.
-
G1 Doors include Model 2000 and Clean Guard.
-
On a LH Drive G1 Door, the Letters will Read Backwards when the Bracket is Mounted onto the Motor.
-
Place the Bracket up on the Motor with the proper Hole Alignment.
-
Place the Lock Washer onto the Screw and Fasten the Bracket onto the Motor.
-
-
-
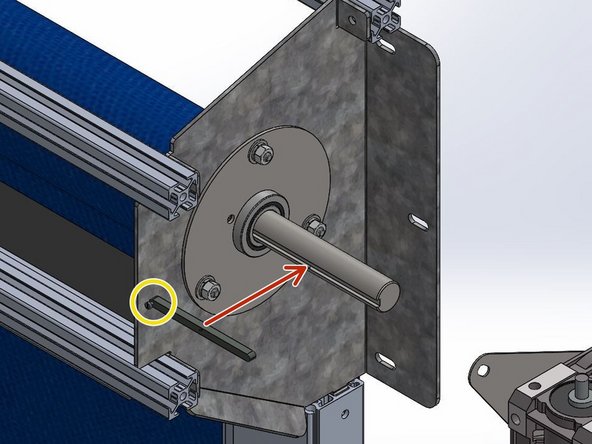
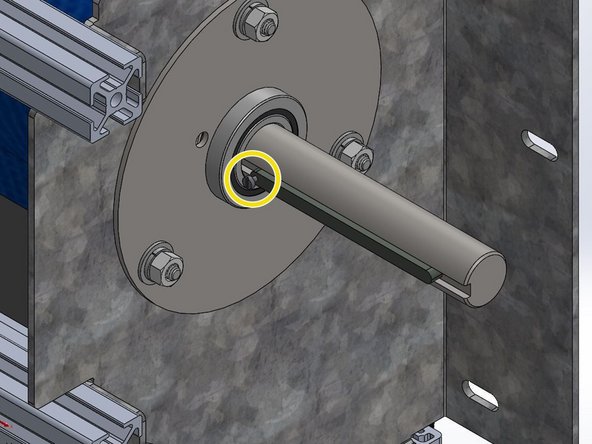
Install the Machine Key onto the Drive Shaft with the Set Screw Oriented Towards the Header (Between Motor and Door).
-
-
-
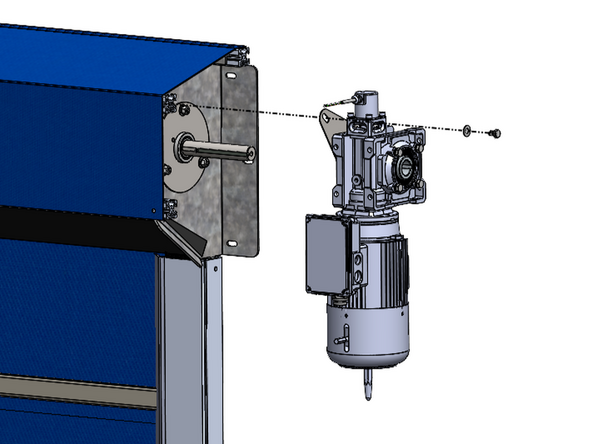
Slide the Motor onto the Shaft and Key.
-
Tilt the Motor to Align the Hole in the Motor Mount Bracket with the Hole on the end of the Upper, Front Rail.
-
This should result in the Motor being oriented Vertically and Plumb (See Image 2).
-
Place the 5/16 Flat Washer onto the 5/16-18 x 1/2in Hex Bolt and Fasten the Motor to the Door with a Ratchet or Impact Driver.
-
-
-
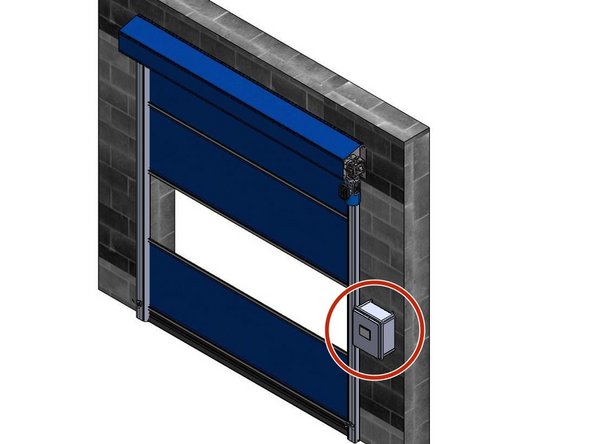
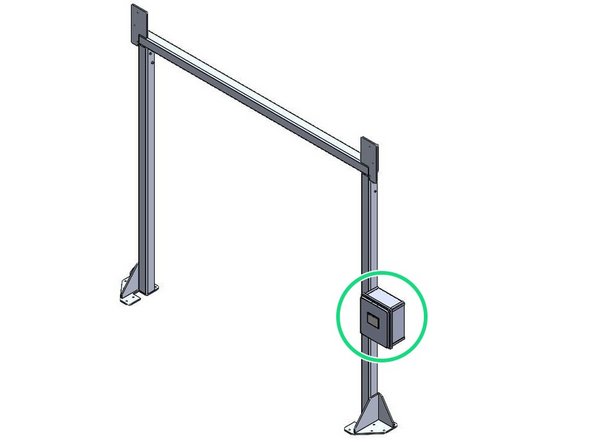
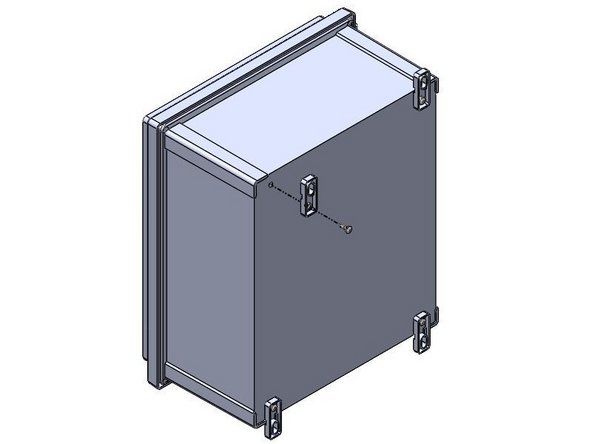
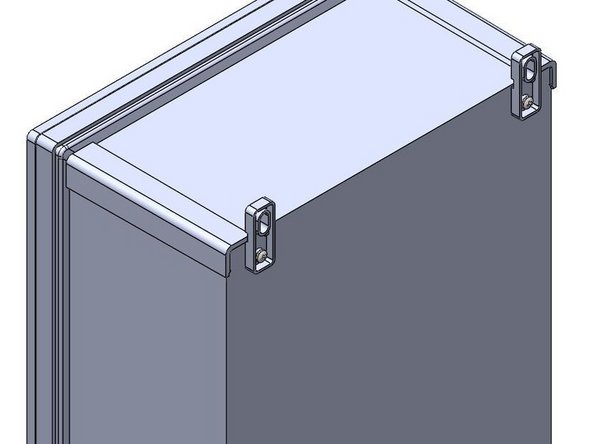
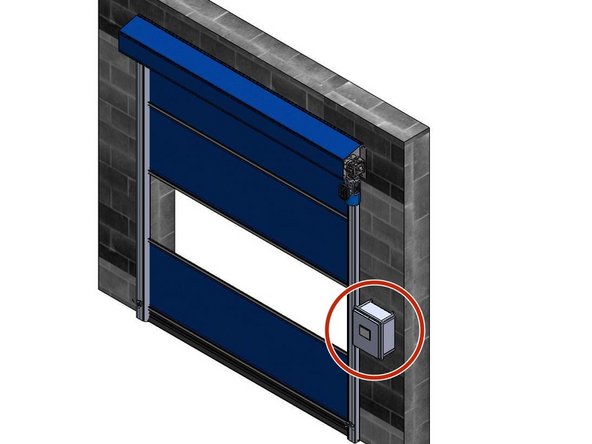
The Goff's Control Panel can be Mounted in two different ways:
-
Flush Mounted on a Wall/Surface with the provided Feet.
-
Mounted on a Door Frame with the provided Side-Mount Bracket.
-
Side-Mount Bracket only included when your door is ordered with a Door Frame.
-
-
-
Inside of the Goff's provided Control Panel, there will be a bag containing (4) Feet and (4) 10-32 x 1/2in Screws
-
There are (4) threaded inserts in the back of the Control Panel that will receive the 10-32 x 1/2in Screws.
-
Use these threaded inserts, to Fasten the provided Feet onto the Control Panel.
-
-
-
Goff's does not provide Fasteners for your Mounting Surface. It is up to you to determine the appropriate fasteners for the material you are mounting to.
-
With the appropriate Fasteners, Secure the Control Panel to the wall through the Feet.
-
The Control Panel can be Mounted at any Height or Location as long as the (2) Cables can reach the Motor.
-
-
-
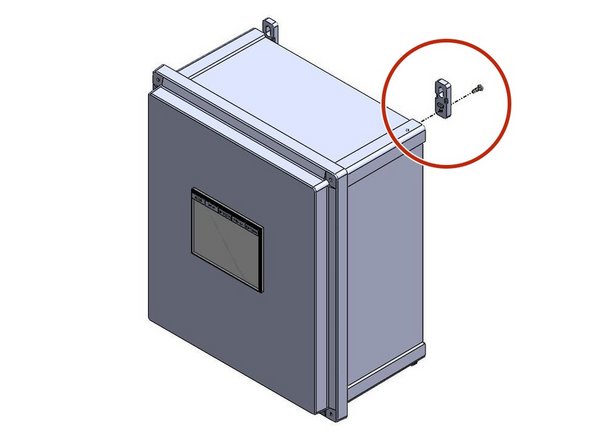
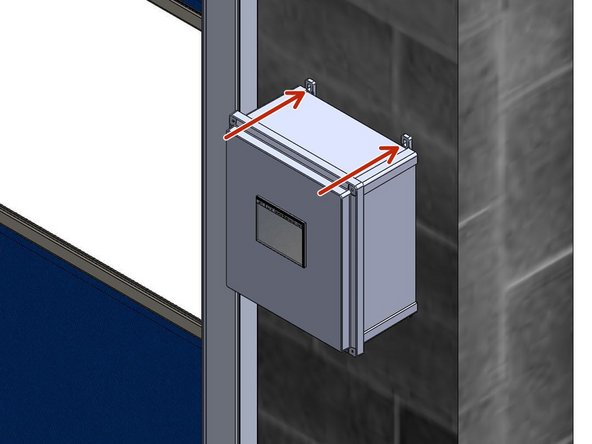
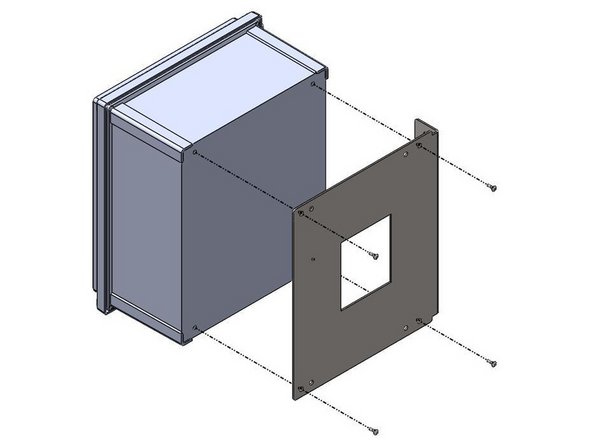
When Side-Mounting a Control Panel onto a Door Frame, the Bracket must be Mounted to the Door Frame Before the Control Panel can be Mounted to the Bracket.
-
Goff's will provide (2) Self-Drilling Fasteners to use for Mounting the Bracket to the Door Frame.
-
The Bracket/Control Panel can be Mounted at any Location on the Door Frame as long as the (2) Cables can reach the Motor.
-
The Bracket can be Flipped to allow Left- or Right-Hand Mounting.
-
-
-
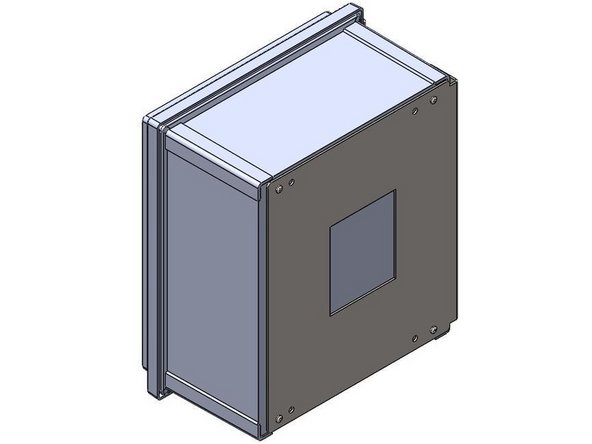
Inside of the Goff's provided Control Panel, there will be a bag containing (4) 10-32 x 1/2in Screws
-
These Screws will be needed to Install Control Panel onto the Side-Mount Bracket.
-
There are (4) threaded inserts in the back of the Control Panel that will receive the 10-32 x 1/2in Screws.
-
Use the Outer-Most Hole Pattern on the Side-Mount Bracket to ensure proper hole alignment with the Control Panel. Use these threaded inserts, to Fasten the Control Panel onto the Side-Mount Bracket.
-
-
-
The provided control panel will have a black 4-conductor cable pre-wired into it.
-
Route this cable up to the motor and make the following connections:
-
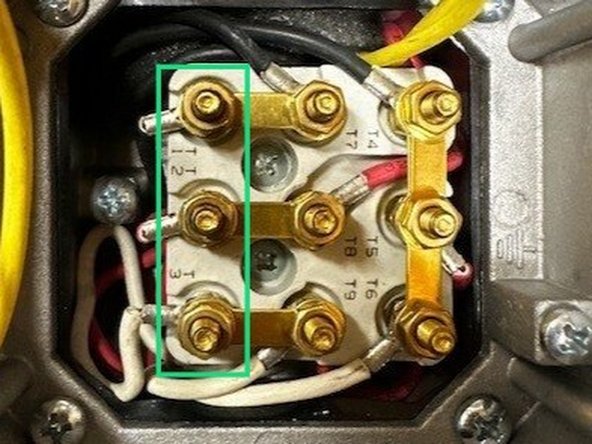
Orange Wire - Terminal T1 (Swap with T2 if needed to reverse motor direction)
-
Red Wire - Terminal T2
-
Blue Wire - Terminal T3
-
Black Wire - V2 (motors equipped with brakes ONLY)
-
White Wire - U2 (motors equipped with brakes ONLY)
-
If your motor is not equipped with a brake, you will not have V2 and U2 labeled terminals. You can then ignore the Black and White wires.
-
-
-
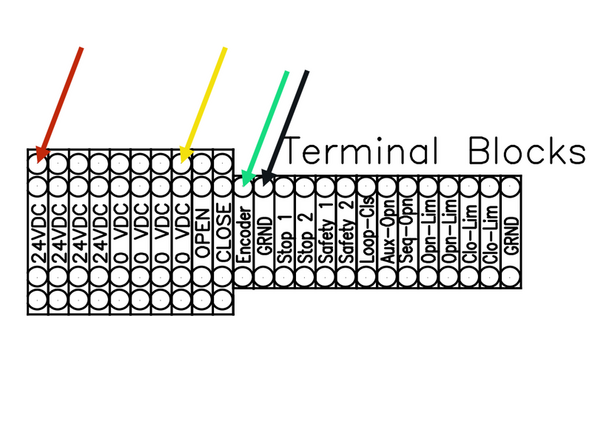
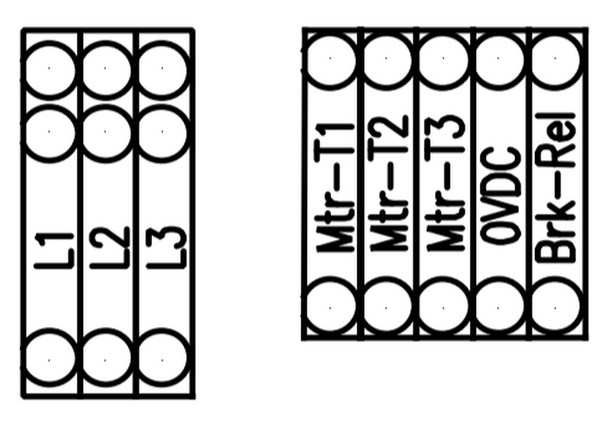
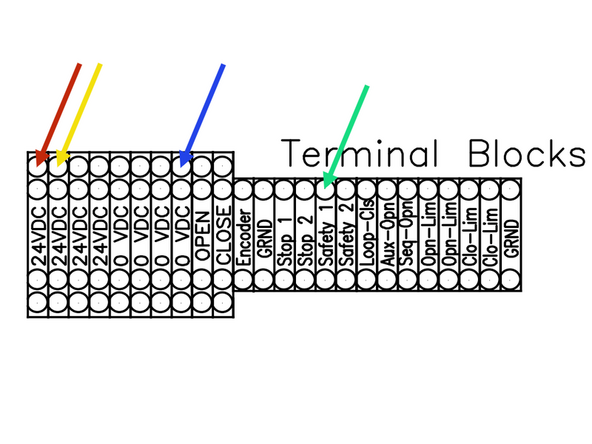
Route the cable from the encoder into the control panel through the provided entry points, and make the following connections on the main terminal block:
-
Brown Wire - 24VDC
-
White Wire - 0VDC
-
Green Wire - ENCODER
-
Black (Drain) Wire - GRND
-
-
-
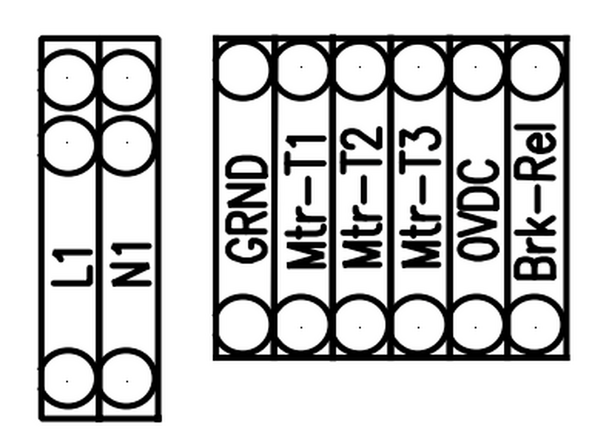
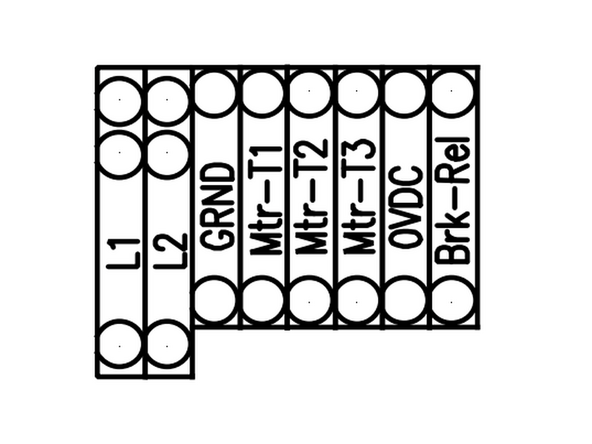
For doors powered by 110/120V single-phase power, land your incoming power as follows:
-
Line 1 (Hot) - L1
-
Neutral - N1
-
Ground - GRND
-
-
-
For doors powered by 200-240V single-phase power, land your incoming power as follows:
-
Line 1 (Hot) - L1
-
Line 2 (Hot) - L2
-
Ground - GRND
-
-
-
For doors powered by 200-240V single-phase power, land your incoming power as follows:
-
Line 1 (Hot) - L1
-
Line 2 (Hot) - L2
-
Line 3 (Hot) - L3
-
-
-
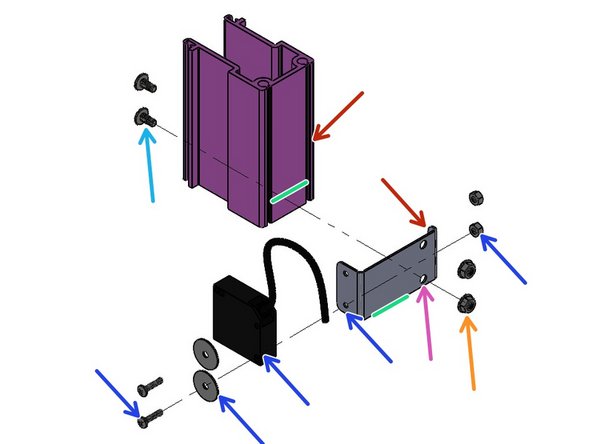
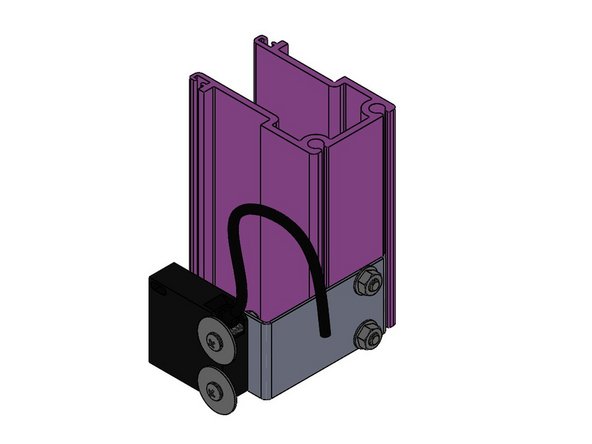
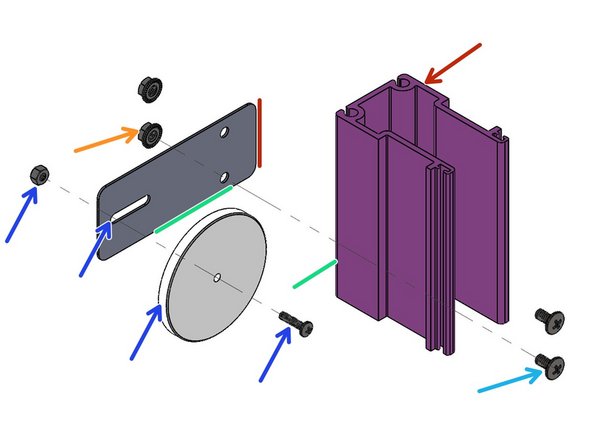
Slide the Small Tab of the Bracket into the Groove in the Track.
-
Align the Emitter Bracket to a Height Line about 5"-8" from the Track Bottom.
-
Mark and Drill the Bracket Mounting Holes in the Track.
-
Place the Washer onto the Sensor Kit Bolt, and then Place the Bolt and Washer through the Emitter, Bracket, and Lock Nut.
-
Insert 1/4" Screws from the inside of the Track.
-
Slide the Emitter Bracket onto the Screws.
-
Secure the Pack with Serrated Flange Nuts.
-
-
-
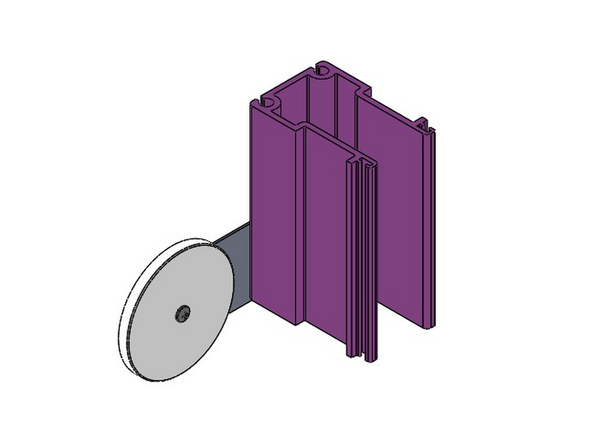
Mark the Back Face of the other Track at the same height as the Emitter.
-
Align the Edge of the Bracket with the Rear Edge of the track.
-
Mark the Bracket Mounting Holes on the Track.
-
Drill .28" Dia. Holes in the Track for the Bracket Mounting Holes.
-
Attach Reflector to the Bracket with Hardware supplied
-
Insert 1/4" Screws from the inside of the Track.
-
Slide the Bracket onto the Screws.
-
Secure the Pack with Serrated Flange Nuts.
-
-
-
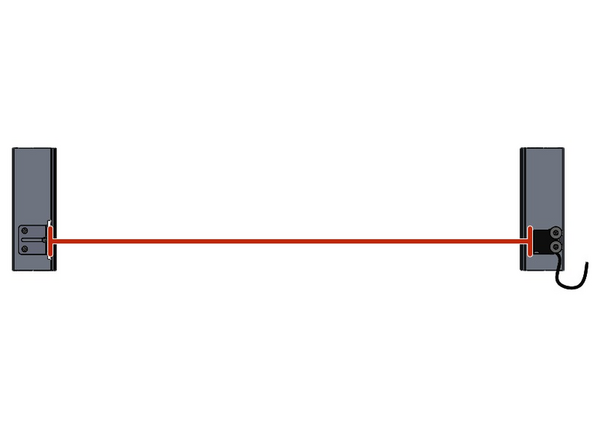
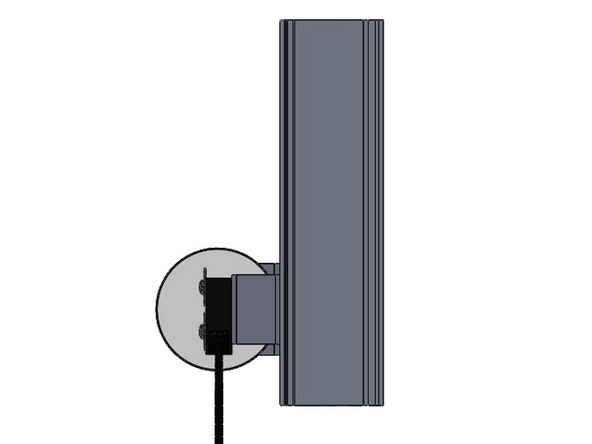
Make sure the Emitter and Reflector are Mounted at appropriate Heights so that the Emitter's Beam will hit the Reflector.
-
-
-
Gray Wire - Not Used
-
Brown Wire - 24VDC
-
Blue Wire - 0VDC
-
White Wire - 24VDC
-
Black Wire - Safety 1
-
-
-
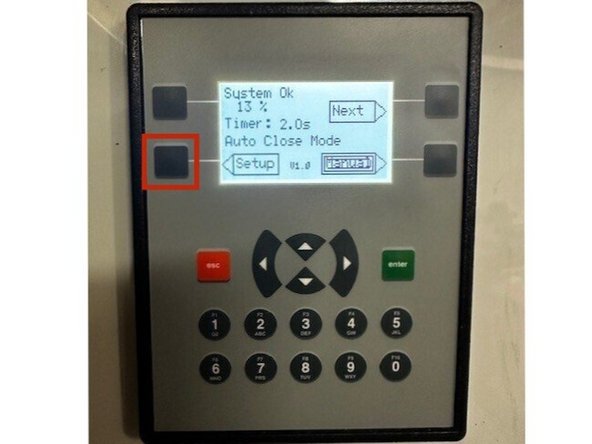
On the front of the control panel, you will see a User-Interface.
-
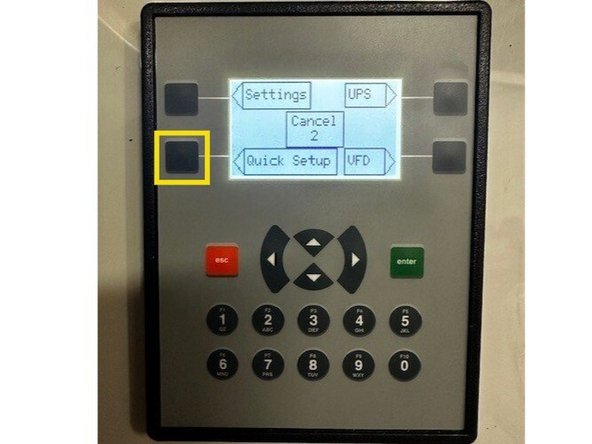
Navigate to the limit setting screen by pressing the following series of buttons:
-
Setup
-
Quick Setup
-
-
-
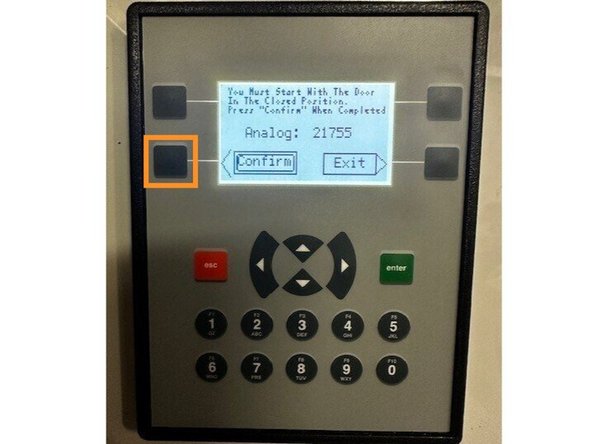
Follow the on-screen tips:
-
Using the close button on the front of the control panel, run the door to the desired closed position.
-
On this screen, the open and close buttons operate under constant-pressure, so the door will only move while the button is pressed/held.
-
When you get to your desired closed limit position, press the 'Confirm' button.
-
-
-
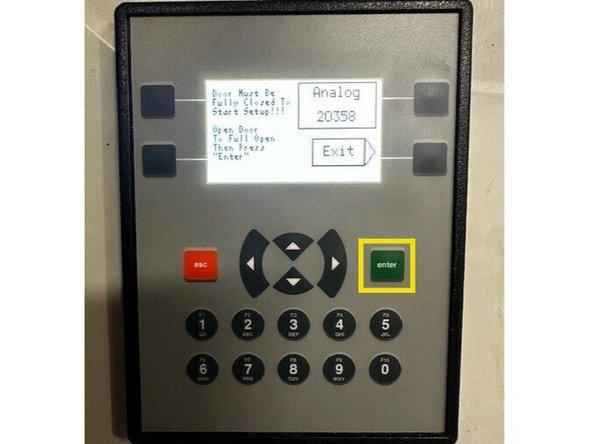
Using the open button on the front of the control panel, run the door to the desired open position.
-
On this screen, the open and close buttons operate under constant-pressure, so the door will only move while the button is pressed/held.
-
When you get to your desired open limit position, press the green "Enter' button.
-
You are now ready to operate your door.
-



Team
