Tools
Parts
No parts specified.
-
-
Locate the Main Terminal Block Inside the Control Panel.
-
Locate the (2) Terminals labeled "Clo-Lim".
-
Place a Wire into one of the Terminals Labeled "Clo-Lim".
-
This wire will go to 24VDC on the Inhibited Door Control Panel.
-
Place a Wire into other/remaining Terminal Labeled "Clo-Lim".
-
This wire will go to "Stop 1" on the Inhibited Door Control Panel.
-
The Door with Wires landed in "Clo-Lim" will be the Inhibiting Door.
-
If the Inhibiting Door is not fully Closed, the other Door will not be able to be Opened.
-
-
-
Locate the Terminals labeled "Stop 1" and 24VDC. Remove factory jumper connecting these Terminals.
-
Place a Wire into one of the Terminals Labeled 24VDC.
-
This wire will go to one of the Terminals Labeled "Clo-Lim" on the Inhibiting Door Control Panel.
-
Place a Wire into the Terminal Labeled "Stop 1".
-
This wire will go to other/remaining Terminal Labeled "Clo-Lim" on the Inhibiting Door Control Panel.
-
If the Inhibiting Door is not fully Closed, the Inhibited Door will not be able to be Opened.
-
-
-
Tap the Following Series of Buttons:
-
Setup And Diagnostics
-
Setup
-
Settings
-
Next Screen (Top Right Corner)
-
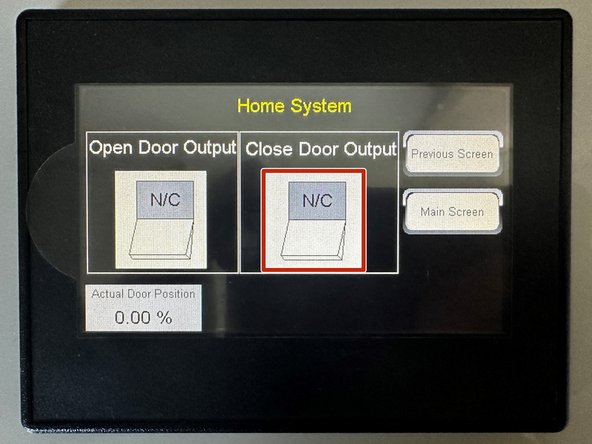
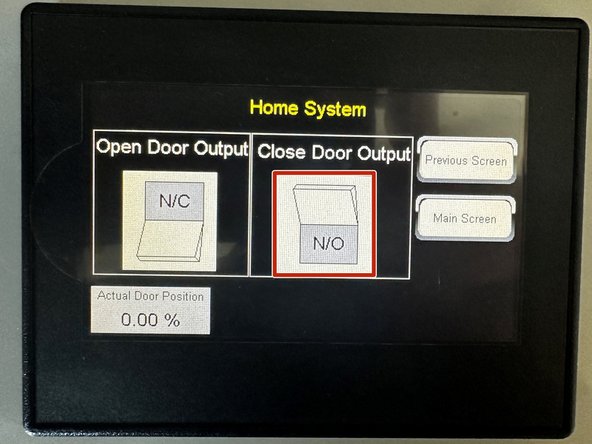
N/C And N/O Outputs
-
Tap the "Close Door Output" Toggle to switch the Output to be N/O.
-
Press "Main Screen" followed by "Operator Screen" to get back to Home.
-
-
-
The Doors are now Interlocked.
-
If the Inhibiting Door is not fully Closed (on the Close Limit), the Inhibited Door will not be able to be Opened.
-
If you are Interlocking more than 2 Doors, please call Technical Support @ 262-746-3374 to walk through that process.
-


